
-

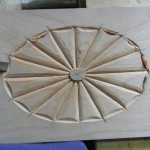
- Finished (with some slight sanding – yech)
-
- With a curved gouge (#3, 6mm or #5, 5mm) round over the circle shape in the center to create a “bead”
-
- With a flatter gouge (#3, 14mm) make the outside cut of the “fingernail” shape at a slight angle – to meet with the inside cut at a sharp corner
-

- With a #7,10mm and #5, 12mm make the inside cut of the “fingernail”. This cut should be at a slight angle.
-

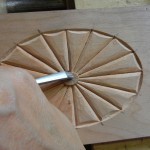
- With a v-chisel, carve the little “fingernail” segments at the edge. This is just to remove the bulk of the wood. Don’t let the v-cuts go all the way to the edge of this fingernail shape.
-

- With a flat chisel, round over the edges down to this sharp v-cut. Make sure you are going with the grain. You can also use a back-bent gouge here.
-

- With a flat chisel, make a staight cut on these v-cuts. This will ensure a nice clean straight line. The larger the flat chisel, the better. This cut is going at least 1/32″ deeper than the original v-cut
-

- With a v-chisel, cut directly on each of the lines. The deeper you go with these, the more shape the shell can have. I cut these lines about 1/16″.
-

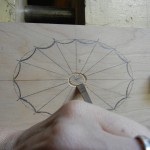
- Re-draw the lines that were carved away
-

- With a #5, 14mm, gently slope down the fan area about 1″ away from center circle
-
- With a curved gouge that fits the outside edge of the center circle, define the edge with a vertical cut – about 1/16″ deep
-
- With a v-chise, carve around the center circle
-
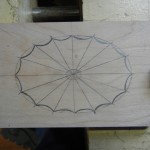
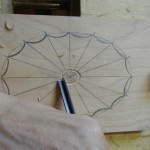
- Sketch of the design
I have been putting off doing taxes for the past … ohhhh…. 6 months or so. So I have spent the past 4 days working on finishing taxes and am so desparate to get my hands into carving again, I am resorting to the next best thing – writing about it!
I carved this about 6 months ago, and have had the photos sitting there eagerly wanting to get out. So, here it is….
The sunburst design (and I’m sure there is a more “proper” name for this, but with taxes in the brain I can’t think of it at the moment) is quite often seen in fireplace mantels where there is a large horizontally placed design in the center, and 2 smaller vertical shaped sunburst shapes on either end of the mantel. You see this quite often in the historic homes here in Charleston.
There are many different ways that these are seen – sometimes the little center design has 4 leaves carved into it. Sometimes the “fingernail” shape is more pronounced or sometimes ends with just a simple v-cut around the outside. You also can see these where each of the rays are concave rather than convex.
Also, an interesting thing while laying out the rays. If it were a circle, it would simply be dividing it into quarters, then divide each of thos segments down the middle, and then divide these next segments down the middle, etc.
Well.. visually it doesn’t work that way with an oval. The spacing between each of these rays needs to be equal along the edge of the oval. This will give it a more balanced appearance. If you draw it with the 45 degree angles (as with a perfect circle), the tighter curve on the oval will seem to have the rays squished, and the longer curve will have the rays appear too large.
Ahhh. That felt better. At least my brain entered into the carving mode again. I am ready to tackle more numbers now!
It is very helpful for a beginner when you tell the depth of your v-cuts, as in these instructions. It is difficult to judge in closeup videos.
Do you have a template for the sunburst? Equally spaced points along the circumference of an ellipse is not easy to draw.
Thank you again for your excellent instruction.
Charles
Charles,
I will keep this in mind in future videos. I do not have a template of this particular design, as I sketched it directly on the wood. One way to get a template (and I will do this in the next day or so) is print out a photo, and trace over the top. That one I believe was around 8″ wide. I use this technique quite often if I do not have an original to look at, but only have photos. The trick sometimes in this process is to figure out the unknowns, such as depth. Then, if it is a brand new design that I have never done before, I start out conservatively with a shallow depth, and then progress to deeper until it visually looks correct. The “visual” judgement just comes from taking the time to study and learn about the many different designs out there … time….