Gothic tracery and arcades
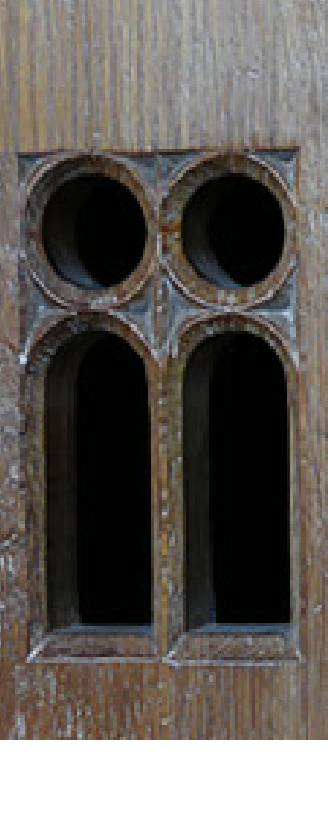
Quote from Tim Gillane on August 24, 2017, 6:14 pmI'm building an aumbry (a medieval cabinet), and want to do pierced Gothic carving on part of the door. I had drawn out an "arcade" -- two sets of two arches each, similar to those in the picture. Any tips or cautions? I'm particularly interested in knowing how to carve the slanted portion from the edge of the arch down to the actual opening, and how to allow for that (especially since I have one shot at it without having to re-do the door). Thanks for any information.
I'm building an aumbry (a medieval cabinet), and want to do pierced Gothic carving on part of the door. I had drawn out an "arcade" -- two sets of two arches each, similar to those in the picture. Any tips or cautions? I'm particularly interested in knowing how to carve the slanted portion from the edge of the arch down to the actual opening, and how to allow for that (especially since I have one shot at it without having to re-do the door). Thanks for any information.
Uploaded files:Quote from Matthew Mizner on August 24, 2017, 9:41 pmTim,
Are you using gothic traditional oak for your cabinet, or a different kind of wood?
Tim,
Are you using gothic traditional oak for your cabinet, or a different kind of wood?
Quote from MaryMay on August 25, 2017, 10:19 amHi Tim,
The process I would us is start carving this "cove" out with a smaller, more curved gouge. This would be used to carve the bulk of this area of the wood away - especially if it is oak. Get most of it carved out where only cleaning up is needed. Then use a gouge that fits that hollow exactly and finalize that cut right up to the edge and final curve. The process of carving the inside, mitered corners are actually shown in the latest lesson on the Timber Frame Capital.
The biggest difficulty is making sure you carving in the correct grain direction (the inside of the donut!). And those areas at the right and leaf of the circle where the grain switches can get pretty messy. Make sure you do a final cut across the grain to clean this.
Hope his helps.
Hi Tim,
The process I would us is start carving this "cove" out with a smaller, more curved gouge. This would be used to carve the bulk of this area of the wood away - especially if it is oak. Get most of it carved out where only cleaning up is needed. Then use a gouge that fits that hollow exactly and finalize that cut right up to the edge and final curve. The process of carving the inside, mitered corners are actually shown in the latest lesson on the Timber Frame Capital.
The biggest difficulty is making sure you carving in the correct grain direction (the inside of the donut!). And those areas at the right and leaf of the circle where the grain switches can get pretty messy. Make sure you do a final cut across the grain to clean this.
Hope his helps.
Quote from Matthew Mizner on August 31, 2017, 8:37 amTim,
I love gothic tracery, and after I saw your post, I dropped my current project and started a small tabletop bookshelf that I've been putting off for awhile.
Like you, I was wondering how to carve the convex areas while keeping them uniform. I marked lines on the surface of the panel and also on the inside. Just like Mary said above, I used a #7 to round out the convex portions. The marked lines helped keep a perfect uniform convex shape throughout, while I carved to the edge of each. Hope this is what you were asking about!
I attached a picture showing the gouge cutting to the top and inside lines.
Tim,
I love gothic tracery, and after I saw your post, I dropped my current project and started a small tabletop bookshelf that I've been putting off for awhile.
Like you, I was wondering how to carve the convex areas while keeping them uniform. I marked lines on the surface of the panel and also on the inside. Just like Mary said above, I used a #7 to round out the convex portions. The marked lines helped keep a perfect uniform convex shape throughout, while I carved to the edge of each. Hope this is what you were asking about!
I attached a picture showing the gouge cutting to the top and inside lines.
Uploaded files:Quote from Matthew Mizner on August 31, 2017, 8:42 amHere's the overall tracery section...the long stretches you were talking about will be the easier part of your carving. All downhill and no worries!
I enjoyed tracery! I only used 4 gouges for the whole thing: #7-14, 3-16, 2-20 and 1-12.
Dont forget to post your project...I would like to see it. And I like the design you used...I'll keep that for future work if you don't mind?
Here's the overall tracery section...the long stretches you were talking about will be the easier part of your carving. All downhill and no worries!
I enjoyed tracery! I only used 4 gouges for the whole thing: #7-14, 3-16, 2-20 and 1-12.
Dont forget to post your project...I would like to see it. And I like the design you used...I'll keep that for future work if you don't mind?
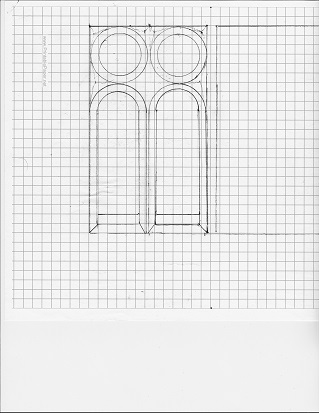
Uploaded files:Quote from Tim Gillane on September 1, 2017, 11:09 pmThank you all very much for your help! This is being done with some red oak (a bit crumbly at times when carved, hand-routed, or chamfered) I have left from dismantling a set of shelves that came with our house. Matthew, the photo above is from a 15th century English aumbry, so I imagine that the person who carved it is now occupied with other things (redoing the Pearly Gates in oak?). At the moment, I'm practicing on a piece of scrap of the same wood that the aumbry's made of, and have definitely kept the "inside of the donut" advice in mind (thanks). I have a couple of #7 Ramelson palm tools (8mm and 3.5mm) which the oak basically laughs at, and a couple of large #7 gouges that I suspect are really turning gouges (old, and made of metal that's pretty tough to sharpen to a bevel that works). The convex areas in the drawing I did (below) are about 3/32" wide, and I've been practicing with a #3-10mm and a #8-13mm, so I may be giving Chipping Away a look. I'm trying to round out my set of tools two or three at a time within a budget; I saw something yesterday about a "tracery gouge"; from what I gather, it's a sort of specialized bent spoon gouge, but it seems very specialized.
Thank you all very much for your help! This is being done with some red oak (a bit crumbly at times when carved, hand-routed, or chamfered) I have left from dismantling a set of shelves that came with our house. Matthew, the photo above is from a 15th century English aumbry, so I imagine that the person who carved it is now occupied with other things (redoing the Pearly Gates in oak?). At the moment, I'm practicing on a piece of scrap of the same wood that the aumbry's made of, and have definitely kept the "inside of the donut" advice in mind (thanks). I have a couple of #7 Ramelson palm tools (8mm and 3.5mm) which the oak basically laughs at, and a couple of large #7 gouges that I suspect are really turning gouges (old, and made of metal that's pretty tough to sharpen to a bevel that works). The convex areas in the drawing I did (below) are about 3/32" wide, and I've been practicing with a #3-10mm and a #8-13mm, so I may be giving Chipping Away a look. I'm trying to round out my set of tools two or three at a time within a budget; I saw something yesterday about a "tracery gouge"; from what I gather, it's a sort of specialized bent spoon gouge, but it seems very specialized.
Uploaded files:Quote from Tim Gillane on September 1, 2017, 11:21 pmMatthew Mizner - Is that tracery above done in oak or something else? Very nice.
Matthew Mizner - Is that tracery above done in oak or something else? Very nice.
Quote from Matthew Mizner on September 2, 2017, 12:05 pmTim, thank you, and it's red oak as you are using...I would rather have used white, but I had a board of red in the garage.
As far as the spoon gouge you found online, I have a couple #7 spoon gouges, but after using them and the 7 straight gouge, the straight was just faster getting through the cuts.
Tim, thank you, and it's red oak as you are using...I would rather have used white, but I had a board of red in the garage.
As far as the spoon gouge you found online, I have a couple #7 spoon gouges, but after using them and the 7 straight gouge, the straight was just faster getting through the cuts.


